Making Flat Chanter & Regulator Reeds
by Tom Kennedy
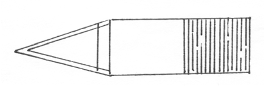
Dimensions for staples may vary so consult a reedmaking manual. Use a round cone shaped mandrel to shape the eye of the staple first. Please see illustration “A”.
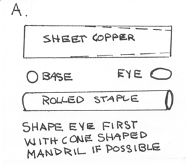
Figure A.
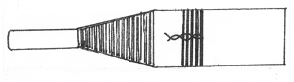
Gouge a slip about 4 1/2” X 5/16” wide. When the sides are about one millimeter thick and the center is around .040, sand the inside on a cylinder, or use sandpaper wrapped around a cork from a wine bottle (a reasonably priced French wine will do, red is good). Prepare sanded slip as shown in illustration “B”. NOTE: begin to pare tails at 1 1/4” and use straight angle to end of reed. Leave some cane at the tails rather than coming straight down to a point at the tails. You may decide to round the edges off and to remove some cane for the staple. Measurements I use are: staple: 7/8, winding 1”, point to begin paring for tails: 1 1/4”. Scrape away the middle portion of the reed and don’t try to complete all of the scraping at this stage, but the lips should be quite thin. Check for an even smooth “window” to show when the slip is held to a light bulb
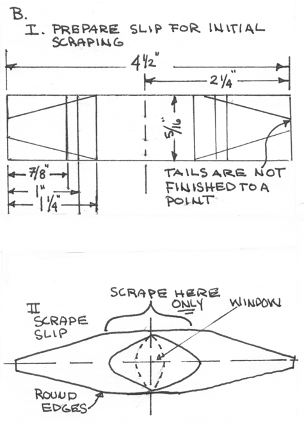
Figure B.
Bind the reed onto the staple. Let sit overnight, if you have the time. Hold reed in thumb and fore finger and scrape from winding to the lips. Protect winding with string and bevel corners to keep them from splitting. After base of reed is sufficiently scraped, attach the bridle. NOTE: the bridle will help to spring the reed open enough to keep scraping the middle without the razor contacting the edges of reed. See illustration “C”. Allow reed to sit and close down. Then chop it and tune and balance as per instructions.
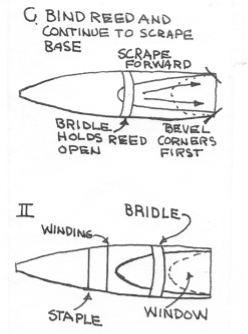
Figure C.
Andreas Rogge’s Method of Reed Making
Andreas Rogge is a German pipe maker who also considers himself a professional reed maker. He reeds all his own sets and during Tionól’s he can be found sitting at a table making and tuning reeds for anyone who needs his services. Over the years he has made hundreds of reeds.
Andreas’ method incorporates the idea that the reed wants to open and always has tension. He prefers to close it down with the bridle rather than squeeze the bridle on the sides to open the lips. He will also move the bridle up the reed if necessary.
Andreas uses a special tapered staple that he has manufactured. They have no seam and are 5.33cm long, .515mm OD at the wide end and .415mm OD at the small end. The wall thickness of the staple is approximately .035 mm. The small end is squeezed into a “cats eye” shape and is approximately .210 mm OD. If he is experiencing problems while reeding a certain type of chanter, he will use staples made from straight tubing.
Andreas’ Method:
1.Cut slip from cane
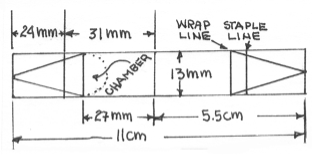
2.Trim slip to 11cm long and 13mm wide. Trim edges of slip to the correct width with a sharp knife or sand on a flat plane.
3.Using a shooting block, gouge the slip to between .050 and .045. The edges of the slip should be thin and sharp.
4.Sand the slip on a cylinder measuring 35mm in diameter and 11cm long with 120 grit sandpaper. Finish slip with 240 grit sandpaper. The sanding cylinder is put on the shooting block which holds it securely while sanding.
5.Cut the slip in half with a sharp knife using the sanding cylinder.
6.Sand each half of the slip face down on 240 grit sandpaper. This will flatten both edges of the slip.
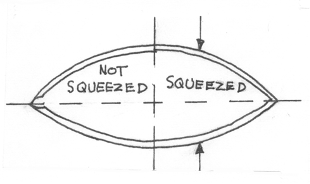
7. Sand each half of the slip on a cylinder approximately 80mm in diameter with 240 grit sandpaper. This sanding bevels the inside edges of the slip causing the slip to be airtight when squeezed by the wrapping and the bridle.
8. Measure 27mm and 31mm from the lips and mark. The 27mm mark is the wrap line. The 31mm mark is the staple line.
9. Cut the tails to shape and bevel.
10. Put a slip in the shooting block and gouge out the tail approximately .005. The gouge starts at the tip of the tail and ends at the 27mm line. Also gouge out a small chamber above the 27mm mark. This gouge should be approximately .008. The tails are gouged so they are more flexible when wrapping and not as prone to cracking. The chamber gives the reed a good sound. Sand both tails and chamber gouge with 240 grit sandpaper.
11. Wipe the inside of the slips with lacquer undercoat. Let dry and sand with 240 grit sandpaper which will remove the raised grain. This is probably an optional step, but it should help the reed remain stable when subjected to climate fluctuations.
12. Hold the slips between your fingers and even up the edges and the tails on 240 grit sandpaper. Wrap the two halves together to prepare for staple placement.
13. Insert the staple to the 31mm line. Mark the end of the tails on the staple with a file. This will give you a reference mark when moving the staple in or out if the upper octave needs tuning. Wrap up to the 27mm line and then wrap back down. The reed should be airtight.
14. Cut the slip from the wrap down to the lips with a sharp knife. Work the edges and the center of the slip. Hold the slip in your left hand with the lips facing you. Cut toward yourself with your right hand. The amount removed is arbitrary and varies with the individual. Eventually this material will have to be removed either by sanding or cutting. Experience is the answer when deciding how much to cut.
15. Sand the slip on a flat surface with 120 grit sandpaper using your index finger. Push quite hard and vary the pressure causing more or less cane to be removed. Do not lift the slip or sand just the tips, but sand all the way from the wrap to the tips. This will leave the blades with an even slope. Change to 240 or lighter grit sandpaper any time during this process. Continue sanding till you get a crow. Use your thumb and index finger to squeeze the blades and simulate the bridle. Again experience will tell you what you are listening for. Cut off approximately 1mm from the lips which are quite thin.
16. Put on a bridle using 4 or 5 wraps of 22 gage copper wire. This type of bridle fits close to the reed and can be manipulated easily with finger pressure to open or close the reed. Just twist the wire ends together with needle nose pliers and cut.
17. Continue sanding until you get the crow you like. The slip should also show a nice second “V” when held up to the light. Put the reed into the chanter and try it. Tune it with the bridle and fine sandpaper. Don’t hesitate to take it apart and re-wrap if the octave is not right or the back “D” is off.
Andreas’ tuning tips and strengthening the back “D”:
If the upper octave is flat, remove the wrap and push in the staple approximately 1mm and re- wrap.
If the upper octave is sharp, remove the wrap and pull out the staple approximately 1mm and re-wrap. The upper octave should always be a bit sharp. The mark on the staple where the tails end facilitates the movement of the staple when tuning upper and lower octaves.
If the gouged chamber is too small, the “C” & “C#” will be too close together. Open the reed and enlarge the chamber.
If the high “E” is flat, the chamber is too large and you will have to close down the chamber by squeezing the reed with a needle nose plier.
Strengthening the Back “D”:
You have made a good reed but the back “D” is weak or breaking.
1. Disassemble the reed.
2. Close staple eye approximately 1/10mm
3. Re-wrap reed
The 2nd octave will flatten and the reed will be harder to blow.
Continue closing down the eye until the back “D” is strong. Don’t hesitate to disassemble and assemble the reed. You will get good at this quickly.
4. Push the staple into the head approximately 1mm to sharpen the upper octave. This will cause lower tension in the head and also make the reed easier to blow. You may have to do this more than once and some- times it doesn’t work at all. If the reed is still flat in the upper octave:
Cut off 1mm from the lips and thin the reed a little at a time.
If the upper octave is still flat, change the staple and/or start again at number one.
Strengthening the back “D” (general):
Back “D” problems are common because “D” is the closest note to the reed. To avoid this, you should not scrape off too much cane at one time. The stronger the reed the more stable the back “D” will be.
The blades have to “seal well” with some internal tension (spring) or it won’t vibrate with power. This can cure a sinking back “D” caused by too thin blade tips or leakage along the edges.
Make your slips thick. The difference between the scrapped and unscraped is greater giving the base of the reed more strength and allowing your tips to remain thicker.
A too long staple can cause problems. Cut off a few mm from the bottom of your staple.
Cut off approximately 1mm from the reed lips. Too thin lips cause back “D” problems.
Move the bridle up and close down the lips a bit.
Opening or closing the staple eye can change the back “D”.