Making a Plastic Bodied Bass Drone Reed
by Kevin Meyers
So why would you want to make a plastic bodied bass drone reed?
1. Well, for my part, I ran out of drone quills, but I had plenty of odd lengths of chanter/regulator cane. Pipe maker Bruce Childress commented, "Now I can use left-over reed material for something besides epoxy stirrers."
2. Another consideration is that, in my humble opinion, you can make a more precise reed that is easier to balance (you can control responsiveness much better) than the traditional quill. This is not a new idea. Tim Britton, whom I admire greatly for his artistry as a pipemaker, makes (or at least made) lovely wood bodied drone reeds with separate cane tongues. It is also covered in David Quinn’s “The Piper’s Despair”. Obviously, this is the same concept, just a different choice of materials.
3. Once you have figured what your tongue thickness should be, when it's time for a replacement, you can easily duplicate the tongue, thus duplicating responsiveness and stability. I feel it is easier getting separate tongue reeds into stable playing condition.
Now that the justification is out of the way, let's get to the project. All the materials necessary for this project are available from a hobby shop or a hardware store. And the best news is, you do not need any special tools for this project. Well, the project will be easier if you have access to a router and a belt sander.
Materials
1. A 4 3/4" to 5" long piece of 5/16" OD x 3/16" ID plastic tubing. I cut mine 4 3/4" long. Exact length will depend on your pipes. For your information, I play a Eugene Lambe set, but the gang at the Second Philadelphia Tionól sleeved down the bass drone for me years ago.
2. Adhesive. This should be something strong like two-part epoxy or Goop
3. Waxed thread to tie the tongue to the body. I used the waxed thread that Tandy Leather sells.
4. I also use a small o-ring as an adjuster. I have found that o-rings don't loosen or move as thread bridles sometimes will. The drone body is tapered and there can be difficulties with thread. I purchased an assortment of o-rings in the automotive section of a department store for $1.99. Also, I know that most automotive stores have o-ring assortments from which you can buy one or two, if you wish.
5. End plug material. I used a piece of flat, gray hobby shop plastic from the same display rack where I got the plastic tubing. As long as the material is compatible with the adhesive and is thick enough for the tongue to make a seal, you are only limited by your imagination.
6. Sandpaper. Various grits up to 240/fine grit
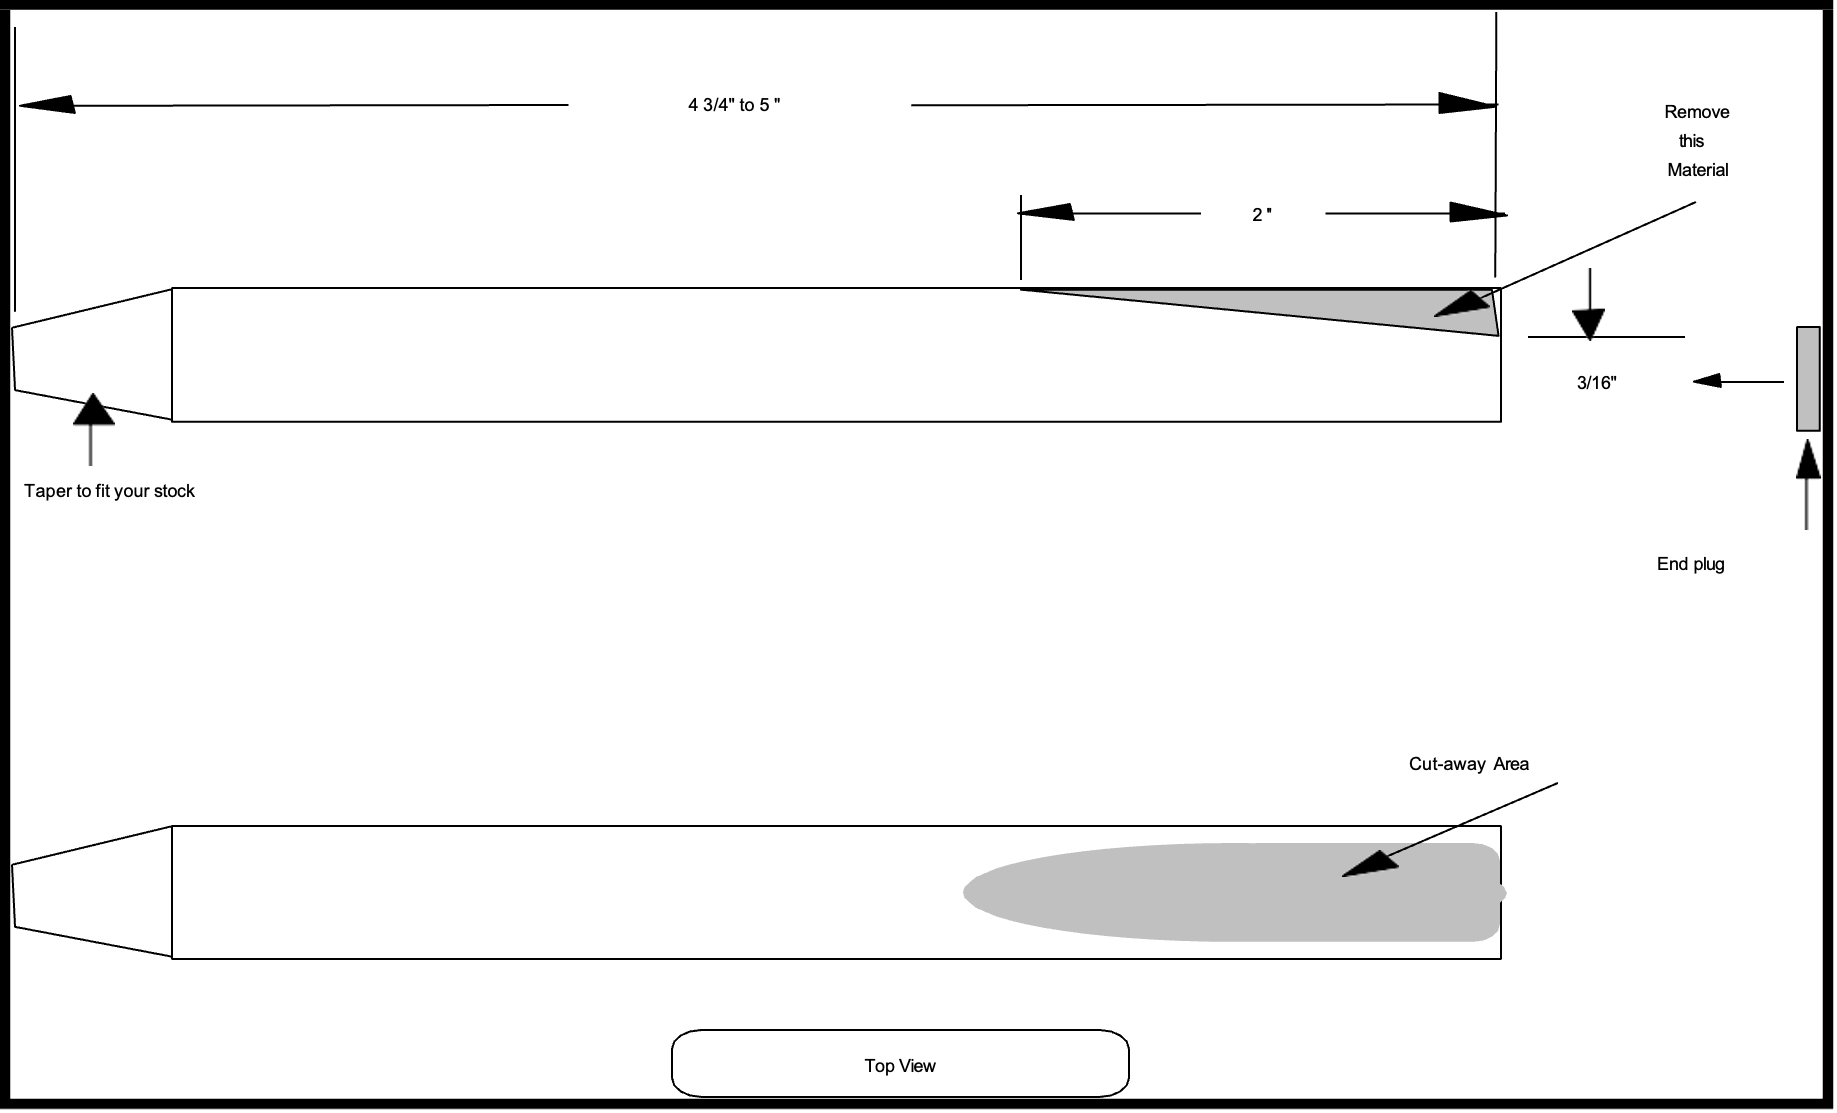
Making the Drone Body
1. Cut the plastic tubing to length.
2. Mark the tubing 2 1/4" from one end. See Figure 1. Sand from this mark to the end, making a tapered flat on the tubing. The opening in the tubing should be 2” long. I used my Black & Decker belt sander to do this. You could make the flat parallel to the bore of the tubing which would probably make a better reed because the bridle would stay in place better.
3. Epoxy (or whatever) the end plug to the tubing. Make the end plug a bit over size. Set the drone body aside until the adhesive is completely dry.
4. Lay a piece of sandpaper on a flat surface. Lap the drone body until the cut away area and the end plug are completely smooth and flat.
5. Taper the other end of the drone body to fit your drone.
Making the Cane Tongue
1. Cut a piece of cane approximately 1/4" wide by 2" long.
2. Sand the tongue until it is .040" - .045" thick. I routed a slot a bit larger than the tongue and less than .040" deep in a piece of hardwood. Place the tongue in the slot and lap the tongue flat. Be sure that the tongue is uniformly the same thickness. Hint; when you make your cane tongue, make two. That way when you make your first tongue too thin, you will have another to replace it.
Well, that's it. Tie the tongue to the drone body, install the o-ring, flick the tongue a few times, and away you go.
Tuning
Basically, all the same cause and effect relationships that occur with cane quill reeds apply to plastic bodied reeds.
Once you've determined what the thickness of the tongue should be, write it on the tongue.
If the tongue is too thin, it will change pitch when you let off on bag pressure and/or when you increase bag pressure sharply, the reed will cut out.
Wandering pitch can also mean that the bridle is not tight enough. Or you need to move the bridle down the tongue.
If the bridle is moved too far down the tongue, the reed will cut out when bag pressure is increased. Use a thicker tongue.
The ultimate length of the reed is limited by the stock dimensions of your pipes. If you've made the longest reed you can with the thickest tongue you can push and you still can't get the reed flat enough, sleeve the drone reed. Plastic soda straws work fine. If that doesn’t work, you should consider inserting a sleeve into your drone.